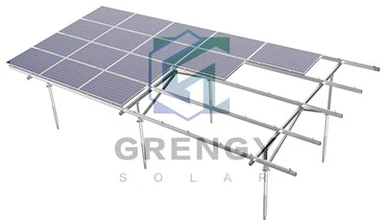
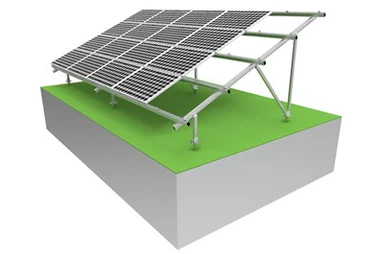
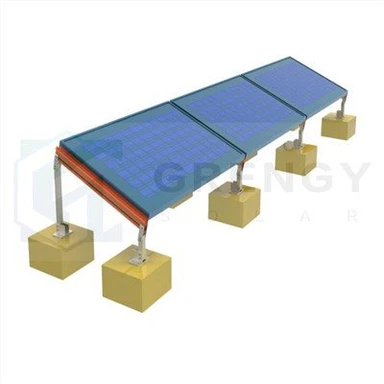
Solar Panel Ground Mounting Structures
Material: Aluminum 6005-T5 & HDG & ZAM
Max Wind Load: According to the projects request
Max Snow Load: According to the projects request
Solar Module Orientation: Portrait or Landscape
Application:Ground or Farm
Pre-assembled parts at the factory, fast and easy to install
OEM & Sample: Available
- Fast Delivery
- Quality Assurance
- 24/7 Customer Service
Product Introduction

who choose us?
Xiamen Grengy Photovoltaic Technology Co., Ltd., founded in 2007, specializes in R&D, design, manufacturing, and sales of diverse photovoltaic bracket products. Upholding the "Serve Customers and Create Value" principle, it offers high-quality, efficient, safe, and long-lasting products. With a professional and efficient R&D team, it supplies various photovoltaic bracket products of different specs and models..
one-stop solution
professional team
high quality
For more details, pls email:rukin@grengysolar.com
The installation of solar panel ground-mounting structures involves the following key steps:
1. Site Preparation
Survey the Site: Conduct a comprehensive survey of the installation site. Evaluate the terrain, soil conditions, and sunlight exposure. Ensure there are no obstructions such as trees or buildings that could shade the solar panels. Analyze the slope of the land to determine the most suitable mounting method and ensure proper drainage.
Clear the Area: Remove any vegetation, rocks, or debris from the site to create a clean and level surface. This is crucial for the stability of the ground-mounting structure and to prevent any damage to the panels during installation.
Mark the Layout: Based on the design of the solar array, mark the positions of the ground mounts and any necessary access paths or maintenance areas. Use stakes and string to outline the boundaries and ensure accurate placement of the components.
2. Foundation Installation
Excavation: Dig holes or trenches for the foundation supports according to the manufacturer's specifications. The depth and width of the excavations will depend on the type of ground-mounting structure and the soil conditions. For example, in soft soil, deeper and wider foundations may be required to provide sufficient stability.
Pour Concrete or Install Anchors: Place concrete footings in the excavated holes to support the ground-mounting structure. Mix and pour the concrete correctly to ensure maximum strength. Alternatively, some ground mounts use helical anchors or other types of mechanical anchors that are screwed or driven into the ground. Ensure these are installed to the proper depth and torque specifications.
Allow for Curing and Setting: If using concrete footings, allow sufficient time for the concrete to cure and reach its full strength. This usually takes several days, depending on the weather conditions and the type of concrete used. Do not proceed with the next steps until the foundation is completely set.
3. Mounting Structure Assembly
Unpack and Inspect Components: Carefully unpack all the components of the ground-mounting structure and inspect them for any damage or defects. Ensure that all the necessary hardware, such as bolts, nuts, and washers, are included.
Assemble the Frame: Follow the manufacturer's instructions to assemble the ground-mount frame. This may involve connecting vertical posts to horizontal rails using bolts or other fastening methods. Ensure that all connections are tight and secure to prevent any movement or instability.
Install Adjustable Features: If the ground-mounting structure has adjustable tilt or tracking features, install and adjust them according to the desired angle and orientation. This may require using specialized tools and following specific calibration procedures to ensure optimal sunlight capture.
4. Solar Panel Installation
Lift and Place the Panels: Using appropriate lifting equipment or with the help of multiple installers, carefully lift the solar panels and place them on the mounted structure. Ensure that the panels are aligned properly and fit securely into the mounting brackets or clamps.
Secure the Panels: Fasten the solar panels to the mounting structure using the provided hardware. This may involve tightening screws or bolts to hold the panels in place. Make sure the panels are firmly attached to withstand wind, snow, and other environmental forces.
Connect the Electrical Wiring: Run the electrical cables from the solar panels to the inverter or combiner box. Follow proper electrical installation practices, ensuring that the wires are properly insulated, grounded, and connected according to the system design. Use waterproof connectors and conduits to protect the wiring from the elements.
5. System Testing and Inspection
Electrical Testing: Use electrical testing equipment to check the performance of the solar panels and the entire electrical system. Measure the voltage, current, and power output of the panels to ensure they are operating within the expected range. Check for any electrical faults or shorts in the wiring.
Mechanical Inspection: Inspect the entire ground-mounting structure and solar panel installation for mechanical integrity. Check for any loose connections, misaligned panels, or signs of stress on the structure. Ensure that the panels are securely fastened and that the ground mount can withstand the expected loads.
Functionality Testing: If the system includes any tracking or monitoring features, test them to ensure they are working properly. Verify that the solar panels are tracking the sun accurately and that the monitoring system is providing accurate data on the system's performance.

Hot Tags: solar panel ground mounting structures, suppliers, factory, customized, custom, buy, Adjustable Triangle Mounting System, Solar Panel End Clamp, Roof Racking, Solar Panel Brackets for Roof, Metal Roof Clamps, Roof Hooks for Solar Panels