How Are Solar Panels Mounted On A Roof
Aug 28, 2025
Mounting solar panels on a roof requires a structured process that balances structural safety, weather resistance, and optimal sun exposure-and the exact steps vary slightly by roof type (tile, metal, flat). Below is a step-by-step breakdown of the universal workflow, paired with roof-specific adjustments to ensure a secure, long-lasting installation.
Phase 1: Pre-Installation Prep (Critical for Safety & Compliance)
Before any physical work begins, lay the groundwork to avoid mistakes and meet local standards:
1. Assess the Roof's Suitability
Age & Condition: Ensure the roof has at least 10–15 years of remaining life (e.g., asphalt shingles last 20–25 years; tile roofs 30+ years). Replace aging roofs first-reinstalling panels later is costly.
Load Capacity: A roof must support the weight of panels (2–4 lbs/sq. ft.) + mounting hardware + snow/wind loads (check local codes: e.g., 2 kN/m² for heavy snow in New England). Hire a structural engineer for older homes to confirm.
Sun Exposure: Use a solar pathfinder or app (e.g., Sun Surveyor) to map shade-avoid areas blocked by trees, chimneys, or neighboring buildings (shade cuts output by 30%+). Prioritize south-facing roofs (Northern Hemisphere) or north-facing roofs (Southern Hemisphere) for maximum sun.
2. Gather Tools & Materials
Tools: Drill (with masonry bits for tile roofs, metal bits for metal roofs), torque wrench (to avoid over-tightening), bubble level, tape measure, ladder/scaffolding (OSHA-compliant for roof access), and a stud finder (to locate rafters).
Core Materials:
Mounting hardware: Roof hooks (for tile), clamp-on brackets (for metal), or ballasted anchors (for flat roofs) - all made of corrosion-resistant materials (SUS 304 stainless steel, 6061-T5 aluminum).
Rails: Galvanized steel or aluminum mounting rails (cut to roof length) to secure panels.
Sealing materials: Waterproof flashing, silicone sealant, and neoprene washers (to prevent leaks).
Fasteners: Lag bolts (for rafters), mid-clamps/end-clamps (to attach panels to rails).
3. Secure Permits & Hire Professionals
Most regions require a solar installation permit (submit plans to local building departments, including panel layout and structural calculations).
Hire NABCEP-certified installers (U.S.) or MCS-certified installers (UK)-DIY is risky for roof work, as improper mounting can cause leaks, roof damage, or even panel detachment in storms.
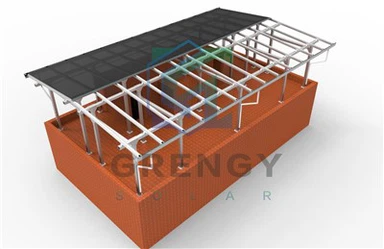
Phase 2: Roof-Specific Mounting Steps
The installation process adapts to your roof's material-here's how to handle the three most common types:
A. Tile Roofs (Ceramic, Concrete, Terracotta)
Tile roofs are fragile, so the goal is to mount panels without damaging tiles:
Step 1: Locate Rafters & Mark Hook Positions
Use a stud finder to identify rafters (typically 16–24 in. apart under tiles). Mark hook locations on the roof-hooks must align with rafters (they're the only structural support for the system).
Space hooks 3–4 ft. apart (matching rail length) to evenly distribute panel weight.
Step 2: Install Roof Hooks (Non-Invasive)
Gently lift a tile (use a tile lifter to avoid cracking) and slide an adjustable stainless steel hook under it, aligning the hook's base with the marked rafter.
Drill a pilot hole into the rafter (to prevent splitting) and secure the hook with a lag bolt (torque to 25–30 ft-lbs).
Replace the tile-most hooks have a low profile that fits under standard tile gaps. For thicker tiles, use "tall" hooks to ensure rails sit level later.
Step 3: Add Waterproof Flashing & Sealant
Place metal flashing over the hook base (to cover the bolt hole) and apply silicone sealant around the edges-this blocks rain from seeping into the attic.
Let the sealant cure for 24 hours (check manufacturer specs) before moving to the next step.
Step 4: Attach Mounting Rails
Lay aluminum or galvanized steel rails across the hooks. Use a bubble level to ensure rails are perfectly horizontal (even 1° off reduces energy output).
Secure rails to hooks with bolts-tighten to the manufacturer's torque specs (usually 10–15 ft-lbs) to avoid bending rails.
Step 5: Mount Solar Panels
Lift panels onto rails (2–3 people per panel-they're ~40 lbs each and fragile). Align the panel's mounting holes with the rail slots.
Fasten panels with mid-clamps (between two panels) and end-clamps (at the edges of the first/last panel). Torque clamps to 8–12 ft-lbs-over-tightening can crack the panel frame.
B. Metal Roofs (Standing-Seam, Corrugated)
Metal roofs are durable and easy to work with-no tile removal required:
Step 1: Choose the Right Brackets
Standing-Seam Metal Roofs: Use clamp-on brackets (no drilling!). These brackets snap onto the raised seams of the roof, with rubberized pads to avoid scratching the metal.
Corrugated Metal Roofs: Use screw-down brackets with neoprene washers. Drill through the ridges of the corrugation (not valleys-valleys collect water) to avoid leaks.
Step 2: Install Brackets & Rails
Space brackets 3–4 ft. apart along the roof's slope. For standing-seam roofs, confirm bracket size matches the seam height (e.g., 1.5 in. brackets for 1.5 in. seams).
Attach rails to brackets-ensure rails are level, then tighten bolts to 12–18 ft-lbs (metal rails can handle more torque than aluminum).
Step 3: Mount Panels & Seal (If Needed)
Follow the same panel-mounting steps as tile roofs (clamps + torque control).
For corrugated roofs: Check that neoprene washers are fully compressed around screw-down brackets-this creates a watertight seal. No extra sealant is needed if washers are properly installed.
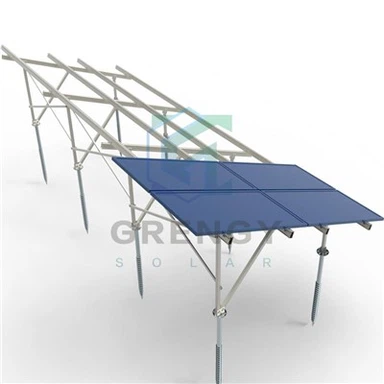
C. Flat Roofs (Commercial/Residential)
Flat roofs use either ballasted (no drilling) or penetrating (drilled) mounts, depending on roof access and waterproofing rules:
Option 1: Ballasted Mounts (Non-Penetrating)
Step 1: Lay a waterproof membrane over the roof (if not already present) to protect against scratches from hardware.
Step 2: Place concrete blocks or water-filled weights in a grid pattern (30–50 lbs/sq. ft. to resist wind uplift). Align weights with the planned rail positions.
Step 3: Attach rails to the weights using bolts. Tilt rails to the ideal angle (based on latitude-e.g., 34° for Los Angeles) using angle brackets.
Step 4: Mount panels to rails as usual.
Option 2: Penetrating Mounts (Permanent)
Step 1: Locate roof joists (flat roofs have wooden/metal joists instead of rafters). Mark anchor positions over joists.
Step 2: Drill through the roof membrane and joist, insert a threaded anchor with metal flashing, and tighten until the flashing sits flush with the roof.
Step 3: Apply roof sealant around the flashing (use a product compatible with your roof membrane-e.g., EPDM or TPO).
Step 4: Attach rails to anchors, tilt to the ideal angle, and mount panels.
Phase 3: Post-Installation Checks (Ensure Safety & Performance)
After mounting, verify the system meets standards before connecting to the grid:
1. Structural Inspection
Check all fasteners (hooks, brackets, clamps) with a torque wrench-confirm they're tight to specs.
For tile roofs: Inspect tiles around hooks for cracks-replace any damaged tiles immediately.
For flat roofs: Test ballasted mounts by pushing gently-no movement should occur (add more weight if needed).
2. Weather Resistance Test
For penetrating mounts (tile, corrugated metal, flat): Spray water on flashings and bolt holes with a garden hose. Check the attic or roof interior for leaks 24 hours later.
For ballasted flat roofs: Ensure weights don't shift when water is added (simulating rain).
3. Sun Exposure & Alignment
Use a solar irradiance meter to confirm panels are tilted to the ideal angle (e.g., 34° for Los Angeles). Adjust rails if needed (possible with adjustable brackets).
Check for shade-trim overhanging tree branches if they block panels during peak sun hours (10 AM–4 PM).
Key Do's & Don'ts for Roof Mounting
Do: Use corrosion-resistant hardware (SUS 304 stainless steel) in coastal/humid areas-saltwater and moisture cause rust, which weakens mounts.
Don't: Mount panels on damaged roofs (e.g., cracked tiles, peeling shingles)-fix the roof first to avoid leaks.
Do: Leave ½–1 in. gaps between panels-airflow cools panels, boosting efficiency by 5–10%.
Don't: Overcrowd the roof-follow local setback rules (e.g., 1 ft. from roof edges) to avoid wind damage.