How To Properly Mount Solar Panels?
Aug 18, 2025
Mounting solar panels correctly is critical to ensuring long-term performance, safety, and compliance with local building codes. Whether you're using roof-mounted, ground-mounted, or specialized (e.g., carport) systems, the process follows core principles of structural integrity, weather resistance, and optimal sun exposure. Below is a comprehensive, step-by-step guide to proper solar panel mounting-including prep work, method-specific steps, and post-installation checks.
Phase 1: Pre-Installation Preparation (Critical for Safety & Compliance)
Before lifting a single panel, complete these foundational steps to avoid mistakes and ensure compliance:
1. Assess the Installation Site
Roof-mounted systems:
Check roof age/condition: Ensure the roof (tile, metal, flat) has at least 10–15 years of remaining life (replace aging roofs first to avoid re-mounting panels later).
Verify load capacity: A roof must support the weight of panels (2–4 lbs/sq. ft.) + mounting hardware + snow/wind loads (check local codes-e.g., 2 kN/m² for heavy snow regions).
Map sun exposure: Use a solar pathfinder or app (e.g., SolarEdge) to confirm no shade from trees, chimneys, or neighboring buildings (shade reduces energy output by 30%+).
Ground-mounted systems:
Test soil stability: Avoid soft, waterlogged soil (use auger piles for loose soil, concrete footings for clay/rocky soil).
Check zoning laws: Ensure the installation is set back from property lines (typically 5–10 ft.) and complies with height limits (e.g., 8 ft. for residential ground mounts).
Specialized systems (carports):
Confirm structural capacity: The frame must support panel weight + vehicle/pedestrian load (e.g., 500 lbs per carport bay).
2. Gather Tools & Materials
Common tools: Drill (with masonry bits for concrete), level, tape measure, wrench set, torque wrench (to avoid over-tightening fasteners), ladder/scaffolding (for roofs).
Materials by system:
Roof-mounted: Mounting rails, adjustable hooks (SUS 304 stainless steel for tile roofs), clamp-on brackets (for metal roofs), waterproof flashing, sealant (e.g., silicone), and lag bolts (to attach to rafters).
Ground-mounted: Galvanized steel/aluminum frames, concrete footings/auger piles, fixed-tilt brackets or tracker motors, and anti-corrosion coating.
Carport: Steel/aluminum support beams, panel mounting rails, and weather-resistant fasteners.
3. Obtain Permits & Hire Professionals
Most regions require a solar installation permit (submit plans to local building departments).
Hire certified installers (look for NABCEP certification in the U.S. or MCS certification in the UK)-DIY is not recommended for roof/ground mounts, as improper installation can cause leaks, structural damage, or fire hazards.
Phase 2: Step-by-Step Mounting for Each System Type
A. Roof-Mounted Solar Panels (Tile, Metal, Flat Roofs)
Follow these steps to preserve roof integrity and ensure a secure fit:
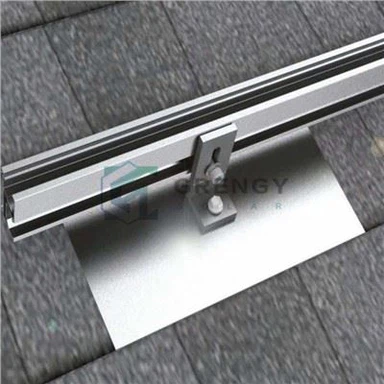
1. Install Roof Hooks/Rails (Base Structure)
For tile roofs:
Locate rafters (use a stud finder-rafters are typically 16–24 in. apart).
Slide adjustable hooks under tiles, aligning them with rafters. Mark drill points.
Drill pilot holes (to avoid splitting rafters) and secure hooks with lag bolts (torque to 25–30 ft-lbs).
Apply waterproof sealant around hook bases and add pre-cut flashings to prevent leaks.
Attach mounting rails to hooks (ensure rails are level using a bubble level-even 1° off reduces energy output).
For metal roofs:
For standing-seam roofs: Clip clamp-on brackets to seams (no drilling needed). For corrugated roofs: Use screw-down brackets with neoprene washers (drill through ridges, not valleys, to avoid leaks).
Secure rails to brackets-space rails 3–4 ft. apart (match panel width).
For flat roofs:
For ballasted mounts: Place concrete blocks in a grid pattern (weight = 30–50 lbs/sq. ft. to resist wind uplift). Attach rails to blocks.
For penetrating mounts: Drill into roof decking, insert anchors with flashing, and secure rails-apply sealant to all penetrations.
2. Mount Solar Panels to Rails
Lift panels onto rails (use 2–3 people-panels are fragile and heavy, ~40 lbs each).
Align panels with rail slots (leave ½–1 in. gap between panels for airflow, which cools panels and boosts efficiency).
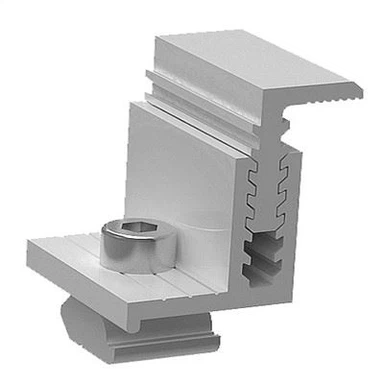
Secure panels with mid-clamps (between panels) and end-clamps (at panel edges). Torque clamps to manufacturer specs (typically 8–12 ft-lbs-over-tightening can crack panel frames).
3. Final Waterproof Checks
Inspect all flashings and sealant-ensure no gaps around hooks/anchors.
For flat roofs, test for leaks by spraying water on penetrations (check attic for moisture after 24 hours).
B. Ground-Mounted Solar Panels (Fixed-Tilt & Trackers)
Ground mounts require site preparation but offer flexibility in angle and scalability:
1. Prepare the Site
Clear vegetation, rocks, and debris-level the area (use a grader for large projects).
Mark footing locations (space footings 6–8 ft. apart, matching frame dimensions).
Install footings:
Concrete footings: Dig 2–3 ft. deep holes, pour concrete, and insert J-bolts (to attach frames) while concrete is wet. Let cure 24–48 hours.
Auger piles: Use a post-hole digger to drive galvanized augers into the ground (3–4 ft. deep for stable soil).
2. Assemble the Frame & Mount Rails
Attach fixed-tilt brackets or tracker motors to footings (for trackers, ensure motors are wired to sensors).
Build the frame: Connect steel/aluminum beams using bolts (torque to 35–40 ft-lbs). Use a level to ensure the frame is square and tilted to the optimal angle (e.g., 30° for 40°N latitude).
Secure mounting rails to the frame-space rails to match panel mounting holes.
3. Install Panels
Place panels on rails, aligning mounting holes with rail slots.
Fasten panels with clamps (same as roof mounts). For trackers, ensure panels are centered on the frame to avoid imbalance.
4. Add Wind/Snow Bracing (For Harsh Climates)
Install diagonal braces between frame posts to resist wind uplift.
For heavy snow regions, add cross-beams to distribute snow load evenly.
C. Solar Carport/Canopy Mounts
Carports combine structure and solar-focus on load-bearing capacity:
1. Build the Carport Frame
Set concrete footings (4–6 ft. deep) for support posts (space posts 8–10 ft. apart, matching carport width).
Attach horizontal support beams to posts (use steel brackets for extra strength). Ensure beams are level and can support panel weight (calculate: 2 lbs/sq. ft. of panel area).
2. Mount Rails & Panels
Attach rails to the top of support beams (angle rails at 15–25° for sun exposure).
Install panels on rails-leave 1 ft. of clearance above the carport floor to avoid hitting vehicles.
Phase 3: Post-Installation Checks (Ensure Safety & Performance)
After mounting, verify the system meets standards:
1. Structural Inspection
Check all fasteners (hooks, clamps, bolts) for tightness (use a torque wrench to confirm specs).
For roof mounts: Inspect tiles/metal for damage (cracked tiles or bent seams must be replaced).
For ground/carport mounts: Test frame stability (push on posts-no movement should occur).
2. Electrical Safety (Critical!)
Ensure wiring (between panels and inverters) is secured to rails/frames (no loose cables that can blow in wind).
Use conduit to protect wires from weather and pests.
Hire an electrician to test the system (check for short circuits and proper grounding).
3. Performance Testing
Use a solar irradiance meter to confirm panels are angled for maximum sun exposure.
Monitor energy output for 1–2 weeks (compare to manufacturer estimates-output should be within 5% of projections).
Key Do's & Don'ts for Proper Mounting
Do: Use corrosion-resistant materials (SUS 304 stainless steel, galvanized steel) in coastal/humid areas.
Don't: Mount panels on damaged roofs (replace shingles/tiles first).
Do: Follow manufacturer instructions-each brand's mounting hardware has specific torque/installation specs.
Don't: Overcrowd panels (leave gaps for airflow-overheating reduces efficiency by 10–15%).