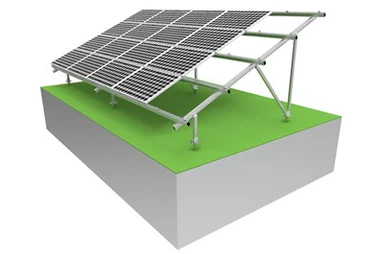
Solar Ground Mount Installation
Material: Aluminum 6005-T5 & HDG or ZAM Steel
Max Wind Load: According to the projects request
Max Snow Load: According to the projects request
Solar Module Orientation: Portrait or Landscape
Application:Ground or Farm
Pre-assembled parts at the factory, fast and easy to install
OEM & Sample: Available
- Fast Delivery
- Quality Assurance
- 24/7 Customer Service
Product Introduction
Quality: We use top materials and precision-engineer our solar racks.
Expertise: Our veteran team has a proven track record in installations.
Customization: Tailor racks to your unique project needs.
Support: Offer pre- and post-sales help.
Cost: Ensure long-term savings with quality products.
Cost savings
Save your money with our logistics service taking advantage of quick delivery.
Various services
Bespoke Solutions
Proven Experience
Thousands of happy clients and hundreds of permanent customers are the result of our work.
Quality products
Our products have reached the international quality standards,
Technical Support
In the after-sales service, we provide technical services.
Free Samples
If you have a product in mind, please let us know,w and for the
For more details, pls email:rukin@grengysolar.com
Preparation before Installation
Site Selection: Pick a sunny, unobstructed area. In the northern hemisphere, south-facing sites are ideal, ensuring no shade from 10 a.m. to 3 p.m.
Soil Check: Assess soil bearing capacity, stability, and drainage. Use drilled-in concrete piles for soft soil, and consider drilled piles, ground - built or concrete block foundations for hard ground.
System Type: There are standard (multi-point ground - connected, lower cost) and pole-mount (single - point ground - connected, can use tracking systems) installations.
Permits: Get planning and building permits from the local government.
Installation Steps
Measure & Position: Determine bracket positions and angles precisely for optimal sunlight exposure.
Foundation Work: Drive piles or pour concrete foundations as per design for bracket stability.
Bracket Setup: Assemble bracket components and fix the foundation, adjusting for levelness.
Panel Installation: Mount panels on brackets, securing them with bolts and clamps, ensuring good sealing.
Electrical Connection: Connect panel cables to send DC power to the inverter, which converts it to AC for grid connection or user use.
Inspection & Maintenance
Inspection: After installation, check bracket stability, panel angles, and electrical connections, and test power generation.
Cleaning: Regularly clean panel surfaces to keep good light transmittance.
Component Check: Inspect brackets, bolts, etc. for looseness, corrosion, or damage, replacing faulty parts promptly.

Hot Tags: solar ground mount installation, suppliers, factory, customized, custom, buy, Ground Screw, PV Grounding Lugs, Solar Roof Tile System, Solar Hanger Bolt, Adjustable Solar Bracket, Carport Racking